Loading Assemblies
In this section we'll cover how you can load a C# assmebly using Mono. First of all you should know that an assembly in C# (and in .NET in general) can be either a DLL or an EXE file. Now before we start writing the loading code we have to have an assembly to load.
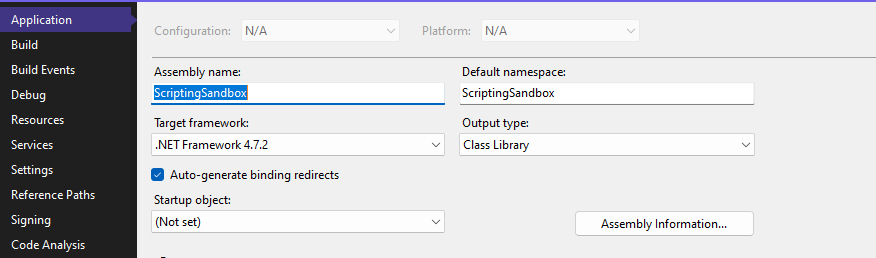
In this example we'll be building our C# project as a Dynamic Link Library, or DLL, Visual Studio calls the project type for DLLs "Class Library" so make sure your C# project has the "Output Type" set to "Class Library", as shown in the image below:
C# Code
In the beginning we'll simply write some basic C# code that will allow us to make sure our code actually works. To start I'll create a C# class called "CSharpTester", and we'll add some basic data and methods to it.
using System;

public class CSharpTesting
{
    public float MyPublicFloatVar = 5.0f;

    public void PrintFloatVar()
    {
        Console.WriteLine("MyPublicFloatVar = {0:F}", MyPublicFloatVar);
    }

    private void IncrementFloatVar(float value)
    {
        MyPublicFloatVar += value;
    }

}
For now we won't actually be running any of this code, but we'll be checking that the class exists in the assembly after we've loaded it. This code will also be used to demonstrate a few things that you need to keep in mind when using Mono.
But for now just go ahead and build your project, you should get a DLL file with your project name somewhere in your project folder, look for a folder called "bin" and you should find it. Remember the file path since we'll need it to load the DLL.
C++ Code
So now it's time for us to write the code that will actually load the C# DLL into Mono. Typically in a game engine you'll have two DLLs that you'll need to load, one that contains the game code, and one that's provided by the engine.
Typically the engine will provide a C# DLL that the game code will link to, this is so that the engine developers can provide a safe API for the user to interact with. Because of this we'll be writing a generic function that will simply load any DLL, this function will take a path to the DLL file as an argument and it will return a pointer to a MonoAssembly.
Now, there's a lot of ways that you can load an assembly using Mono, but the preferred way is to load the file into an array of bytes and then pass that byte array to Mono directly. I'll get into why this is the preferred method later.
I'll also provide a function that can load a file into an array of bytes:
char* ReadBytes(const std::string& filepath, uint32_t* outSize)
{
    std::ifstream stream(filepath, std::ios::binary | std::ios::ate);

    if (!stream)
    {
        // Failed to open the file
        return nullptr;
    }

    std::streampos end = stream.tellg();
    stream.seekg(0, std::ios::beg);
    uint32_t size = end - stream.tellg();

    if (size == 0)
    {
        // File is empty
        return nullptr;
    }

    char* buffer = new char[size];
    stream.read((char*)buffer, size);
    stream.close();

    *outSize = size;
    return buffer;
}
So, here's the code that loads the C# assembly:
MonoAssembly* LoadCSharpAssembly(const std::string& assemblyPath)
{
    uint32_t fileSize = 0;
    char* fileData = ReadBytes(assemblyPath, &fileSize);

    // NOTE: We can't use this image for anything other than loading the assembly because this image doesn't have a reference to the assembly
    MonoImageOpenStatus status;
    MonoImage* image = mono_image_open_from_data_full(fileData, fileSize, 1, &status, 0);

    if (status != MONO_IMAGE_OK)
    {
        const char* errorMessage = mono_image_strerror(status);
        // Log some error message using the errorMessage data
        return nullptr;
    }

    MonoAssembly* assembly = mono_assembly_load_from_full(image, assemblyPath.c_str(), &status, 0);
    mono_image_close(image);

    // Don't forget to free the file data
    delete[] fileData;

    return assembly;
}
Now I'll go through and explain this code bit by bit. First we read the bytes of the C# assembly into a char* buffer. After that we need to give Mono the data that we loaded, we can do this by calling mono_image_open_from_data_full. The first two parameters should be self-explanatory, it's just the data and the size of the data. The third parameter tells Mono if we want it to copy the data, or if we'll be responsible for storing it, here we pass 1, indicating that Mono will copy the data into an internal buffer. The fourth parameter is a pointer to a MonoImageOpenStatus enum, we can use this value to determine if Mono was able to read the data we passed to it, or if there was an issue somewhere.
The last parameter is also a boolean value, and if it's set to true, or 1, it means that Mono will load our image in "reflection mode", meaning we can inspect the types, but not run any code. If you're building an application similiar to JetBrains dotPeek program you'd most likely want to set this parameter to true, but since we want to run the code we'll set it to false, or 0.
mono_image_open_from_data_full will return a valid pointer to a MonoImage struct if it successfully interpreted our data, or nullptr if it failed. After we've loaded our data into Mono we'll check that the status variable is set to MONO_IMAGE_OK, and if it's not we'll query Mono for an error message describing what went wrong, we do this using mono_image_strerror which converts our status variable to a more user-friendly error message.
Now that we have a valid image loaded we'll have to create a MonoAssembly from it, luckily this is really easy, we just have to call mono_assembly_load_from_full and give it the image. If this function succeeds we'll get a pointer to a MonoAssembly struct returned, otherwise it'll return nullptr.
The first parameter of this function is the image that we got back from Mono, the second parameter is essentially just a name that Mono can use when printing errors, the third parameter is our status variable again. This function will write to our status variable if there's an error, but at this point there really shouldn't be an error generated so we won't check for it.
The last parameter is the same as the last parameter in mono_image_open_from_data_full, so if you specified 1 there you should also do that with this function, but in our case we'll set it to 0.
After we've retrieved a MonoAssembly pointer from our image we can (and should) close that image, since it's only used for getting a MonoAssembly pointer, and is useless for anything else. I will note that MonoImages are used for some other things in Mono, and we'll cover that later, but this image is useless so we need to close it to decrease the reference count.
And that's it! But because we're good programmers we'll make sure to free the buffer that we loaded, using delete[] fileData;. After that we can simply return our assembly pointer!
Now you probably want to make sure that the file you're trying to load actually exists, but in this example we're assuming that we'll never try to load a file that doesn't exist on disk.
Alright, now we have a function capable of loading a C# assembly into the Mono runtime, so now it's time to actually load our assembly and verify that our code works, but we'll cover that in the next section.