Introduction
About Me
Hi, my name is Peter, and I'm a game engine developer from Sweden, I'm also the author of this guide. I've been working on a game engine called Hazel for over a year, and one of the things I've worked on is a C# scripting engine, using the Mono library.
Hazel is not my own personal engine, and it was originally created by Yan Chernikov. I joined the project in September of 2020 as a volunteer, and now I'm lucky enough to be able to work on it as an actual job.
The goal of this guide
The goal of this guide is to help you embed the Mono library into your game engine. For the past few months I've been working on rewriting the C# scripting engine in Hazel, and I kept getting frustrated because there's very little in terms of useful documentation on how to use Mono in the scope of a game engine.
Yes, Mono does have a documentation site for embedding: http://docs.go-mono.com/, but in my experience it's all but useless. There are a few open source (or at least source available) projects out there that have embedded Mono, but there's no real documentation available.
So, that's why I decided to create this guide. I've been through the pain of googling for hours to figure out how to do something in Mono, and I figured I could help spare others from that pain.
Before we get started I just wanted to say that this guide is not a guide on building a complete scripting engine, it's just meant to give you the knowledge you need to write a scripting engine.
I will also mention that the "First Steps" section only covers the very basics, I'll go into way more depth and show more complex code in a more advanced section later on.
Credits
I'm not the only person who has contributed to this. I've had some help with certain parts of it, so I wanted to make sure to mention anyone that has helped out.
- Marca, provided build instructions for Mac OSX
The Game Engine Series
As I've mentioned this guide isn't meant to teach you how to write a fully fledged scripting engine. But there is a series on YouTube that does cover writing a scripting engine in C++, the Game Engine Series from The Cherno.
The scripting engine that he's writing is based on the scripting engine that I wrote for Hazel, and he does reference this guide as well. I highly recommend watching the C# scripting related episodes if you're interested in how you can design an actual scripting API.
Understandably there's a lot of different ways of writing a scripting engine, and there's no "correct" way of doing so, although there are worse ways and better ways, as with everything.
About Mono
What is Mono?
I would assume that you already know what Mono is since you decided to check out this guide, but I'll give a short explanation just in case.
In short: Mono is an open source implementation of Microsoft's .NET Framework. It was originally designed to bring .NET languages (mostly C#) to platforms other than Windows. Nowadays it's not strictly necessary for cross-platform support, since Microsoft has been working on making .NET cross-platform natively. But Mono is still very useful for scripting engines, because unlike .NET Core, or .NET Framework, it provides a decent C/C++ API for embedding a .NET runtime.
Multiple versions of Mono?
Now, there are actually two versions of Mono, there's what I call "Classic Mono", which is mainly what we'll be covering here, then there's what I call the ".NET Core Mono". I won't get into the differences between .NET Core and .NET Framework, but the biggest difference is that classic Mono only supports up to C# 7, or .NET Framework 4.7.2, where as .NET Core Mono supports the latest version of C#, and is developed as part of the .NET Runtime project.
Both versions of Mono are developed by Microsoft, but classic Mono isn't integrated into .NET, where as .NET Core Mono is. I will eventually cover building the .NET Core version of Mono as well, but I'll start by covering classic Mono because it's simpler, and more suited for game engines (I'll explain why later on).
Why not use the .NET Core version?
So, why aren't we going to use the .NET Core version of Mono? Simply put: It doesn't support assembly reloading. If you don't know what C# assemblies are I'd recommend you read up a bit on them, but they're essentially a DLL file that contains all your code, converted to an intermediate language (commonly referred to as "IL" or "Bytecode").
So why does assembly reloading matter in this case? Because when you, or anyone else, is writing C# scripts you want the changes you make to the code to take effect in the engine (or editor) immediately, without having to restart the entire editor / game. And in order to do so we first have to unload the old assembly, and load in the new one, without restarting the program.
And in its current state the .NET Core version of Mono doesn't support unloading C# assemblies, where as classic Mono does. When I was initially rewriting the scripting engine for Hazel I wanted to use the .NET Core version because it would've meant that we could support the latest C# version. And unfortunately I only discovered that assembly unloading wasn't supported about 3 months into rewriting the scripting engine...
As it was I got in touch with the developers of Mono to ask them if it was possible to reload assemblies in any way, and they told me no. So I asked them if they knew when that would be supported, and they told me they didn't know... (Yes, I may still be slightly annoyed with them for releasing the .NET Core version without assembly reloading support)
But when the .NET Core version supports assembly reloading I'll make sure to update this book with instructions on how to use that version of Mono (assuming I remember doing so).
But regardless, let's move on to cloning Mono from GitHub, and building the necessary libraries in the next chapter!
Building Mono
Building Mono isn't too hard, but it's a large library, taking up quite a lot of space on your computer, so it will probably take some time to clone, and build it.
Platforms
Here are some links to the instructions for each platform:
Cloning from GitHub
Before we can build Mono, we have to clone it from GitHub. You should hopefully know how to do this yourself, but I know someone won't know how to do that so I'm including this section anyway.
If you don't need a step-by-step guide for this, you should just clone https://github.com/mono/mono.
Alright, in order to clone Mono make sure you have a Git client installed, I'll be providing commands for the command-line git client, but you could also use a GUI client.
In order to clone Mono from the command line, you just run git clone https://github.com/mono/mono, that's it. Yeah I know, this section feels pointless but might as well include it.
Building classic Mono from source
Now we get to the fun part: building Mono from source. Mono is a pretty large project so building Mono can take a bit of time. I'll provide build instructions for Windows, MacOS and Linux (I'll be using Linux Mint when building).
I'll provide the pre-requisites that you'll need to build Mono on the specified platform as to save you some thinking power and pain.
Windows
Building Mono on Windows is ridiculously easy, most likely easier than any other platform. I will note that using Visual Studio only works for building the Mono runtime libraries, not the .NET libraries (e.g System.dll, System.Collections.Generic.dll, etc...).
In my case I won't be building the .NET libraries from source, I'll be getting them by installing Mono locally and copying them from the install directory.
If you want to build the .NET libraries you'll need access to the make command, which you can use by running a Cygwin shell.
Pre Requisites
- An installed copy of Mono (might not be required but it's good to have just in case)
- Visual Studio (I'll be using Visual Studio 2022)
- Cygwin or some other tool that let's you use
make(Only needed if you want to build the .NET libraries)
Building
In order to build Mono you just need to navigate to mono/msvc/ and open up mono.sln in Visual Studio. All you need to do now is select the build configuration and the platform to build for.
I recommend building both the Release and the Debug configuration since only building Release will mean you'll have an even harder time debugging Mono related issues. If you want to build 64-bit or 32-bit doesn't really matter for the sake of this guide, but these days you really don't need to support 32-bit platforms.
After that just start the build and let it run!
If you've done everything correctly (which I assume you have since it's not hard building Mono on Windows) you can move on to the "Getting the Necessary Files" chapter.
Linux
Coming Soon!
MacOSX
Building Mono on Mac is very similar to Linux, you still use make and autogen.
Pre-Requisites
- An installed copy of Mono (only if you don't get
monolite) - Make
Building
The first step is to open a terminal and navigate to the root mono folder.
Before you continue, keep in mind that running ./autogen.sh will cause Mono to clone all the submodules that it will need to build, this process takes quite a long time. Once you're in the root Mono folder you'll want to start by running this command: ./autogen.sh --prefix=<absolutePathToDesiredOutputDirectory> --disable-nls.
Once that command has finished, you'll want to either install Mono locally, or get monolite. If you have Mono installed locally, just continue to the next step, if you want to use monolite however, you'll have to run: make get-monolite-latest in order to get it.
Once you have Mono or monolite you'll want to run make, and then make install to build Mono.
All the necessary libraries should've been placed in the folder you specified as part of the --prefix flag.
Getting the Necessary Files
Now it's time for us to get all the necessary files that we'll need to embed the Mono runtime. This includes the Mono libraries and the .NET libraries. Naturally the files are called different things and located in different places depending on the platform, but I'll provide the necessary files and locations for Windows, MacOSX and Linux.
You can use these links to quickly jump to your platform:
Windows
Native Libraries
All of Mono's native libraries should've been built into mono-root/msvc/build/sgen/{platform}/, where {platform} is either x64 or Win32.
In that folder you'll see three other folders called bin, lib and obj, we're only interested in the bin and lib folders.
Both of those will have either one or two subfolders based on if you built both Release and Debug, or only Release or only Debug.
I will only be telling you what files you'll need, how you choose to structure your projects dependencies is up to you.
So, here's the native libraries that you'll need from lib:
- eglib.lib
- libgcmonosgen.lib
- libmini-sgen.lib
- libmonoruntime-sgen.lib
- libmono-static-sgen.lib
- libmonoutils.lib
- mono-2.0-sgen.lib
- MonoPosixHelper.lib
You're also going to need some files from the bin folder, these files will have to be placed next to your applications executable. These are the DLL files you'll need from bin:
- mono-2.0-sgen.dll
- MonoPosixHelper.dll
.NET Libraries
You don't technically have to copy the .NET libraries into your own program, you can tell the Mono runtime where they're located, but I like having them be a part of the project, so I'll be copying them.
I won't be providing a full list of the files that you'll need, there's a lot of them, instead I'll just tell you what folders you'll need to copy.
If you've installed Mono locally (not just cloned it) you'll have to navigate to the folder where you installed it, in my case I installed it to C:\Program Files\Mono. Inside that install folder you'll want to navigate to lib/mono, and you should see a bunch of folders that have numbers, and some that have an -api postfix.
The main folder you'll want is the one called 4.5, just make sure you copy it into a lib folder, located inside of a folder called mono. In my case it would be D:\dev\MyGameEngine\MyEditor\mono\lib.
I may end up covering the other folders at a later date, but I have only recently started experimenting with them myself so I don't want to provide incorrect information here.
If you built the .NET libraries from source you'll have to navigate to mono-root/mcs/class/corlib, and you should find the same folders there. I haven't done this myself so I could be incorrect, if so please open an issue in the GitHub repo for this page. Located here: https://github.com/peter1745/peter1745.github.io.
Header Files
Getting the correct header files is really easy, they're located in mono-root/msvc/include/. You'll probably want to copy the mono folder, so that when you go to include a Mono header file you type #include <mono/somedir/somefile.h>.
That's it! You've now got all the files you'll need to embed the Mono runtime.
Before we continue I will say that most of the time you'll only need to link with mono-2.0-sgen.lib, but you should still keep the other .lib files around in case you need them later on, or you can delete them if you want to minimize the size of your project as much as possible.
Also remember to at the very least copy mono-2.0-sgen.dll to the same folder as your applications executable.
Linux
Coming Soon!
MacOSX
Native Libraries
All the necessary native libraries you'll need should be located in the output folder that you specified when you built Mono. You'll find a folder called lib in there, that's where the libraries are located.
So, here's the native libraries that you'll need from lib:
- libeglib.a
- libmonoutils.a
- libMonoPosixHelper.dylib
- libmonosgen-2.0.dylib (This is most likely a symlink for libmonosgen-2.0.1.dylib)
.NET Libraries
You don't technically have to copy the .NET libraries into your own program, you can tell the Mono runtime where they're located, but I like having them be a part of the project, so I'll be copying them.
I won't be providing a full list of the files that you'll need, there's a lot of them, instead I'll just tell you what folders you'll need to copy.
If you've installed Mono locally (not just cloned it) you'll have to navigate to the folder where you installed it. Inside that install folder you'll want to navigate to lib/mono, and you should see a bunch of folders that have numbers, and some that have an -api postfix.
The main folder you'll want is the one called 4.5, just make sure you copy it into a lib folder, located inside of a folder called mono.
I may end up covering the other folders at a later date, but I have only recently started experimenting with them myself so I don't want to provide incorrect information here.
If you built the .NET libraries from source you'll have to navigate to the output directory that you specified when you built Mono, and navigate to lib/mono/, and you should find the same folders there. I haven't done this myself so I could be incorrect, if so please open an issue in the GitHub repo for this page. Located here: https://github.com/peter1745/peter1745.github.io.
Header Files
Getting the correct header files is really easy, they're located in include/ in the output directory you specified when you built Mono. You'll probably want to copy the mono folder, so that when you go to include a Mono header file you type #include <mono/somedir/somefile.h>.
That's it! You've now got all the files you'll need to embed the Mono runtime.
Before we continue I will say that most of the time you'll only need to link with libmonosgen-2.0.dylib, but you should still keep the other files around in case you need them later on, or you can delete them if you want to minimize the size of your project as much as possible.
All Done!
Alright, now you should have all the necessary files, and your project should be configured correctly, but if you don't know how to e.g link the Mono libraries to your project, or add the include directory, well, then maybe you shouldn't be considering embedding Mono just yet.
Once you've got your project configured and linking with Mono, feel free to move on to the "Setting up the Runtime" section of this guide!
Setting up the Runtime
Now that we've built Mono, gotten all the necessary files, and hopefully setup our project correctly, it's time to start coding! The very first thing we have to do is initialize the Mono runtime.
In order to properly initialize Mono we have to start by including mono/jit/jit.h, and mono/metadata/assembly.h. Once that's done we have to let Mono know where the .NET libraries are located. The function we'll have to call is mono_set_assemblies_path. Keep in mind that the path provided to this function have to either be an absolute path (e.g D:\dev\Engine\mono\lib), or a path relative to the current working directory (e.g mono/lib).
So in my case it would look like this:
void InitMono()
{
    mono_set_assemblies_path("mono/lib");
}
If you don't provide this path to Mono you'll see an error message printed in the console, it would look something like this:

I will say that if you don't provide this path, but you have a MONO_PATH environment variable that points to the correct folder Mono will attempt to use that path to located mscorlib.dll.
Once we've told Mono where it can locate mscorlib we can actually start the runtime. We have to call mono_jit_init in order to start the runtime, but you may notice that there's actually another function with a similiar name: mono_jit_init_version, so what's the difference?
Well the difference has to do with what version of the runtime we use. By using the first function (mono_jit_init) we're telling Mono to use the runtime version referenced by the first assembly that we load, meaning it will automatically detect it. If we use the second function mono_jit_init_version we can specify the exact version of the runtime we want.
From my experimentation what function we use doesn't have much of an effect, and it's generally speaking safer to let Mono automatically pick the runtime version, so for this guide we'll be using mono_jit_init. We must make sure to give this function a string when calling it, this string essentially represents the name of the runtime.
When calling this function we get a MonoDomain pointer, it's important that we store that pointer since we have to manually clean it up later on. The interesting thing is that Mono actually stores this pointer internally as well, and according to the Mono developers it doesn't really make sense that we have to keep track of that pointer as well, but that's just the way it is, so make sure to store it somewhere.
void InitMono()
{
    mono_set_assemblies_path("mono/lib");

    MonoDomain* rootDomain = mono_jit_init("MyScriptRuntime");
    if (rootDomain == nullptr)
    {
        // Maybe log some error here
        return;
    }

    // Store the root domain pointer
    s_RootDomain = rootDomain;
}
And that's the basics of initializing the Mono runtime. Naturally as we continue to develop our scripting engine further the initialization process will get more complex, but we'll cover the necessary parts when they're needed.
Now we're not quite done with the initialization, before we can load our C# assembly and start running code we have to create an App Domain.
Creating an App Domain
Mono makes it trivially easy to create a new App Domain, all we have to do is call mono_domain_create_appdomain and give our App Domain a name. Remember to store the MonoDomain pointer returned by this function somewhere, we'll need it later on. This process will become slightly more complicated in the future but for now we'll just modify our initalization function to look like this:
void InitMono()
{
    mono_set_assemblies_path("mono/lib");

    MonoDomain* rootDomain = mono_jit_init("MyScriptRuntime");
    if (rootDomain == nullptr)
    {
        // Maybe log some error here
        return;
    }

    // Store the root domain pointer
    s_RootDomain = rootDomain;

    // Create an App Domain
    s_AppDomain = mono_domain_create_appdomain("MyAppDomain", nullptr);
    mono_domain_set(s_AppDomain, true);
}
You may wonder what the second parameter of mono_domain_create_appdomain is, well it allows us to pass a path to a configuration file. We won't be needing this so we can simply pass nullptr.
Once we've got our MonoDomain pointer we have to set our new App Domain to be the current App Domain, we can do this by calling mono_domain_set and pass our domain. The second parameter simply indicates if we want to force our domain to be set as the current domain. In reality we could probably pass false here since all that parameter does is forcibly set the App Domain even if it's being unloaded, but we'll just go ahead and pass true.
Now that we've created our AppDomain we can finally start working towards running C# code from C++! All we have to do now is load a C# assembly, which we'll cover in the next section.
Loading Assemblies
In this section we'll cover how you can load a C# assmebly using Mono. First of all you should know that an assembly in C# (and in .NET in general) can be either a DLL or an EXE file. Now before we start writing the loading code we have to have an assembly to load.
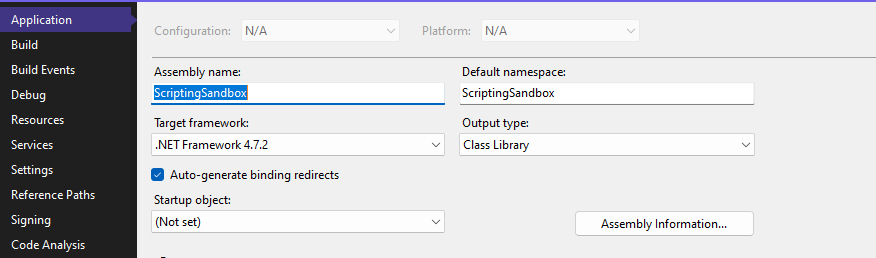
In this example we'll be building our C# project as a Dynamic Link Library, or DLL, Visual Studio calls the project type for DLLs "Class Library" so make sure your C# project has the "Output Type" set to "Class Library", as shown in the image below:
C# Code
In the beginning we'll simply write some basic C# code that will allow us to make sure our code actually works. To start I'll create a C# class called "CSharpTester", and we'll add some basic data and methods to it.
using System;

public class CSharpTesting
{
    public float MyPublicFloatVar = 5.0f;

    public void PrintFloatVar()
    {
        Console.WriteLine("MyPublicFloatVar = {0:F}", MyPublicFloatVar);
    }

    private void IncrementFloatVar(float value)
    {
        MyPublicFloatVar += value;
    }

}
For now we won't actually be running any of this code, but we'll be checking that the class exists in the assembly after we've loaded it. This code will also be used to demonstrate a few things that you need to keep in mind when using Mono.
But for now just go ahead and build your project, you should get a DLL file with your project name somewhere in your project folder, look for a folder called "bin" and you should find it. Remember the file path since we'll need it to load the DLL.
C++ Code
So now it's time for us to write the code that will actually load the C# DLL into Mono. Typically in a game engine you'll have two DLLs that you'll need to load, one that contains the game code, and one that's provided by the engine.
Typically the engine will provide a C# DLL that the game code will link to, this is so that the engine developers can provide a safe API for the user to interact with. Because of this we'll be writing a generic function that will simply load any DLL, this function will take a path to the DLL file as an argument and it will return a pointer to a MonoAssembly.
Now, there's a lot of ways that you can load an assembly using Mono, but the preferred way is to load the file into an array of bytes and then pass that byte array to Mono directly. I'll get into why this is the preferred method later.
I'll also provide a function that can load a file into an array of bytes:
char* ReadBytes(const std::string& filepath, uint32_t* outSize)
{
    std::ifstream stream(filepath, std::ios::binary | std::ios::ate);

    if (!stream)
    {
        // Failed to open the file
        return nullptr;
    }

    std::streampos end = stream.tellg();
    stream.seekg(0, std::ios::beg);
    uint32_t size = end - stream.tellg();

    if (size == 0)
    {
        // File is empty
        return nullptr;
    }

    char* buffer = new char[size];
    stream.read((char*)buffer, size);
    stream.close();

    *outSize = size;
    return buffer;
}
So, here's the code that loads the C# assembly:
MonoAssembly* LoadCSharpAssembly(const std::string& assemblyPath)
{
    uint32_t fileSize = 0;
    char* fileData = ReadBytes(assemblyPath, &fileSize);

    // NOTE: We can't use this image for anything other than loading the assembly because this image doesn't have a reference to the assembly
    MonoImageOpenStatus status;
    MonoImage* image = mono_image_open_from_data_full(fileData, fileSize, 1, &status, 0);

    if (status != MONO_IMAGE_OK)
    {
        const char* errorMessage = mono_image_strerror(status);
        // Log some error message using the errorMessage data
        return nullptr;
    }

    MonoAssembly* assembly = mono_assembly_load_from_full(image, assemblyPath.c_str(), &status, 0);
    mono_image_close(image);

    // Don't forget to free the file data
    delete[] fileData;

    return assembly;
}
Now I'll go through and explain this code bit by bit. First we read the bytes of the C# assembly into a char* buffer. After that we need to give Mono the data that we loaded, we can do this by calling mono_image_open_from_data_full. The first two parameters should be self-explanatory, it's just the data and the size of the data. The third parameter tells Mono if we want it to copy the data, or if we'll be responsible for storing it, here we pass 1, indicating that Mono will copy the data into an internal buffer. The fourth parameter is a pointer to a MonoImageOpenStatus enum, we can use this value to determine if Mono was able to read the data we passed to it, or if there was an issue somewhere.
The last parameter is also a boolean value, and if it's set to true, or 1, it means that Mono will load our image in "reflection mode", meaning we can inspect the types, but not run any code. If you're building an application similiar to JetBrains dotPeek program you'd most likely want to set this parameter to true, but since we want to run the code we'll set it to false, or 0.
mono_image_open_from_data_full will return a valid pointer to a MonoImage struct if it successfully interpreted our data, or nullptr if it failed. After we've loaded our data into Mono we'll check that the status variable is set to MONO_IMAGE_OK, and if it's not we'll query Mono for an error message describing what went wrong, we do this using mono_image_strerror which converts our status variable to a more user-friendly error message.
Now that we have a valid image loaded we'll have to create a MonoAssembly from it, luckily this is really easy, we just have to call mono_assembly_load_from_full and give it the image. If this function succeeds we'll get a pointer to a MonoAssembly struct returned, otherwise it'll return nullptr.
The first parameter of this function is the image that we got back from Mono, the second parameter is essentially just a name that Mono can use when printing errors, the third parameter is our status variable again. This function will write to our status variable if there's an error, but at this point there really shouldn't be an error generated so we won't check for it.
The last parameter is the same as the last parameter in mono_image_open_from_data_full, so if you specified 1 there you should also do that with this function, but in our case we'll set it to 0.
After we've retrieved a MonoAssembly pointer from our image we can (and should) close that image, since it's only used for getting a MonoAssembly pointer, and is useless for anything else. I will note that MonoImages are used for some other things in Mono, and we'll cover that later, but this image is useless so we need to close it to decrease the reference count.
And that's it! But because we're good programmers we'll make sure to free the buffer that we loaded, using delete[] fileData;. After that we can simply return our assembly pointer!
Now you probably want to make sure that the file you're trying to load actually exists, but in this example we're assuming that we'll never try to load a file that doesn't exist on disk.
Alright, now we have a function capable of loading a C# assembly into the Mono runtime, so now it's time to actually load our assembly and verify that our code works, but we'll cover that in the next section.
Testing Assembly Loading
So, now we have a function capable of loading a C# assembly. So all we have to do now is make sure it actually works properly. How do we do that? Well, we could of course just check that we get a valid MonoAssembly pointer, but that doesn't strictly mean that everything's working as expected.
In order to properly test it we're going to be iterating over all the class types defined in our assembly, that way we can see exactly what classes, structs and enums are in there. The way we do this is by iterating through the assembly metadata, which we can do by getting access to the type definitions table.
The Code
Alright that sounds good in theory, but how do we do that? Well it's surprisingly easy, although the code can look a bit complicated at first.
void PrintAssemblyTypes(MonoAssembly* assembly)
{
    MonoImage* image = mono_assembly_get_image(assembly);
    const MonoTableInfo* typeDefinitionsTable = mono_image_get_table_info(image, MONO_TABLE_TYPEDEF);
    int32_t numTypes = mono_table_info_get_rows(typeDefinitionsTable);

    for (int32_t i = 0; i < numTypes; i++)
    {
        uint32_t cols[MONO_TYPEDEF_SIZE];
        mono_metadata_decode_row(typeDefinitionsTable, i, cols, MONO_TYPEDEF_SIZE);

        const char* nameSpace = mono_metadata_string_heap(image, cols[MONO_TYPEDEF_NAMESPACE]);
        const char* name = mono_metadata_string_heap(image, cols[MONO_TYPEDEF_NAME]);

        printf("%s.%s\n", nameSpace, name);
    }
}
Tables
And that's how easy it is to iterate through all the type definitions in our assembly! But, what does this code actually do? Well it's actually quite simple, simply put the assembly itself stores all the necessary info about the data it contains in a set of tables, you can find a list of all the tables and their columns here, scroll down to the "Metadata Tables" section and you'll find a list of them.
Basically what Mono allows us to do is to iterate through all the rows in each table, in the case of the MONO_TABLE_TYPEDEF table each row represents a type, and the columns contains information about that type. We can get a table from an image by making use of mono_image_get_table_info, and passing in the image and the "id" of the table we want.
And as you can see from the code we can get the assembly image from an assembly by calling mono_assembly_get_image and passing in the assembly.
Rows and Columns
After we have the table that we want to iterate through we have to get the number of rows, or type definitions in this case, in that table, we can do that by calling mono_table_info_get_rows and passing in the table info pointer.
We then loop over all rows, and now we have to get all the column values for each row. All columns store their data as unsigned 32-bit integers, and so we start by allocating a stack array called cols, and setting the size of the array to the maximum number of columns for the table we're iterating. Mono provides us with constants that represent the number we need for each table, so in this case we set the size of the array to MONO_TYPEDEF_SIZE.
In order to populate the array we have to decode the current row in the type definitions table, we can do this by calling mono_metadata_decode_row, and passing in a few parameters, while I think the parameters are self-explanatory I realize that might not be the case for everyone, so I'll go through and explain what each parameter is.
The first parameter is the actual table that we're iterating over. The second parameter is the row whose columns we want to get. The third parameter is simply the columns array that we allocated, and the last parameter is the size of that array.
After we've called this function our cols array will now be populated with a bunch of values, and we can now use those values to get some of the data for this type.
A quick note before I explain the rest of the code: The data stored in this array should be used differently depending on what the column represents, in some cases the value is the value that we want, stored right there in the array, other times the value represents an index into a different data structure somewhere else in memory, in the case of the namespace and name of a given type the columns store indices into the string heap.
So sometimes you'd do what we're doing here, and using the value to get a string from the string heap, and sometimes you'd use the value as-is, the MONO_ASSEMBLYREF_MAJOR_VERSION is a good example of this, if you wanted to get the major version of an assembly you'd have simply do uint32_t majorVersion = cols[MONO_ASSEMBLYREF_MAJOR_VERSION];, assuming you have the correct table.
Getting the Type Name and Namespace
Now that I've explained that bit I'll explain the next two lines in the code, you can see they're almost identical, we call mono_metadata_string_heap for both lines, and we're passing in the image, and some value from the columns.
First we're getting the namespace name by accessing the value stored in the MONO_TYPEDEF_NAMESPACE column, again that value is an index into the string heap, where the name of our namespace is located. If a type doesn't have a namespace, meaning it's in the global namespace, this function will simply return an empty string.
Next we do almost the exact same thing, except we're getting the value in the MONO_TYPEDEF_NAME column.
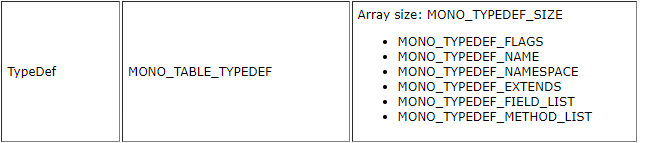
As you can see from the image below there's still a few other columns in the MONO_TABLE_TYPEDEF table, I'm not going to cover them here right now, but I'll make sure to properly cover them at a later date.
Alright! If you now call this function (after you've loaded the assembly) you should see all types stored in your assembly printed to the console.
The Module Type
Now you might've noticed that the very first type printed is called <Module>, and you probably realize that there's no type with that name in your project, so what's going on? Well it's actually a type that's provided by the C# compiler, and all C# DLLs and EXEs have this type.
Effectively this type represents your entire assembly, your assembly will always have at least one module, although it's possible to create a Multifile Assembly which is an assembly that contains multiple modules. Regardless that doesn't matter here, because we will never use the <Module> class in this guide, and you'll most likely never have to use it if you're making a scripting engine.
And that's it for this section! If you saw your types printed in the console it's safe to assume that everything works as expected and you've learned a bit more about how C# assemblies stores data, and we can now move on to actually doing something interesting. In the next section we'll be creating an instance of our CSharpTesting class.
Getting a reference to a C# class
So in order for us to call methods and access properties on a C# class from C++ we first have to get a reference to that class, and create an instance of it.
There are many ways of getting a reference to a C# class but the simplest is by making use of the mono_class_from_name function, which lets us get a class by name.
So lets say we want to get a reference to our CSharpTesting class, in that case our code would look something like this:
MonoClass* GetClassInAssembly(MonoAssembly* assembly, const char* namespaceName, const char* className)
{
    MonoImage* image = mono_assembly_get_image(assembly);
    MonoClass* klass = mono_class_from_name(image, namespaceName, className);

    if (klass == nullptr)
    {
        // Log error here
        return nullptr;
    }

    return klass;
}

// ...

MonoClass* testingClass = GetClassInAssembly(appAssembly, "", "CSharpTesting");
Creating an instance from our class
Once we have our class we have to actually instantiate it. Instantiating a class involves two steps, first we have to allocate the object, then we have to call the correct constructor. Let's start by taking a look at the code, there are however some things we have to keep in mind with constructors that I'll cover at a later date.
// Get a reference to the class we want to instantiate
MonoClass* testingClass = GetClassInAssembly(appAssembly, "", "CSharpTesting");

// Allocate an instance of our class
MonoObject* classInstance = mono_object_new(s_AppDomain, testingClass);

if (classInstance == nullptr)
{
    // Log error here and abort
}

// Call the parameterless (default) constructor
mono_runtime_object_init(classInstance);
As you can see Mono makes it very easy to instantiate a C# class from C++.
Explaining the Code
First we retrieve our C# class, after that we have to allocate the instance of that class. Now remember, allocating a class and constructing a class are two very different things, allocating simply means allocating enough memory to hold all of the class data, and constructing means calling one of the classes constructors, which will initialize all the fields and properties stored in the class.
We allocate an instance of the class by calling mono_object_new, and we pass two parameters: first we pass the AppDomain that we created when we initialized Mono, remember this isn't the domain we got back from mono_jit_init, it's AppDomain we explicitly created. Secondly we pass the actual class that we want to allocate an instance of. If everything goes they way we want it to we should end up with a new instance of that class, although mono_object_new can return nullptr.
Keep in mind that this instance is effectively useless until we've actually called the constructor.
After we've allocated the instance we now have to call the constructor, or initialize the instance. There is however a pretty big design problem we have to solve though: Classes can have multiple constructors. So which one do we call? Well the simplest way of solving this issue is to either know beforehand what constructors any given class will have, or we can simply enforce a requirement that all classes that will be constructible from C++ *have to have a parameterless constructor.
In Hazel we use both of these approaches, for most classes we assume they will have a parameterless constructor, but we support constructors that take any number of parameters as well.
For this simple example we'll assume that all classes have a parameterless constructor though. And don't worry if you haven't explicitly added a parameterless constructor, if you don't provide any constructors at all the C# compiler will automatically generate a constructor without parameters for you. If you do provide a constructor that has parameters you will however have to create a parameterless constructor explicitly.
So what does mono_runtime_object_init actually do? Well it simply tries to call the parameterless constructor for the class instance that you give it. If it can't find a parameterless constructor it will assert, so we'll eventually have to manually check if the parameterless constructor exists.
Once we've called that function our MonoObject will be completely initialized and ready to be used, but before we get to that I'll explain what we have to keep in mind when constructing C# objects.
Now understandably for a proper scripting engine you'd want to be able to search through the entire C# assembly and effectively get a list of what scripts you can instantiate, and have everything be a bit more dynamic. But again this guide isn't teaching you how to write a scripting engine, it's simply giving you the knowledge about Mono that you'll need to write a scripting engine.
If you're really interested in writing a proper scripting engine I'd highly recommend checking out the Game Engine Series from The Cherno on YouTube. He does make some use of this guide for reference.
In the next section we'll be covering how to call C# methods from C++!
Calling C# Methods from C++
Alright, now that we've got an instance of a C# class, it's time to call some methods. It's important to note that Mono gives us two ways of calling C# methods: mono_runtime_invoke and Unmanaged Method Thunks. This section will only cover mono_runtime_invoke, but I will definitely cover Unmanaged Methods Thunks later. I will however go over the differences between the two in this section.
mono_runtime_invoke vs. Unmanaged Method Thunks
So, what's the difference? Well the difference is mainly in how Mono actually ends up calling the method in question, and also what parameters you can pass in.
Using mono_runtime_invoke is slower compared to Unmanaged Method Thunks, but it's also safe and more flexible. mono_runtime_invoke can invoke any method with any parameters, and from what I understand mono_runtime_invoke also does a lot more error checking and validation on the object you pass, as well as the parameters.
Unmanaged Method Thunks are technically called "Unmanaged to Managed Thunks", but I call them "Unmanaged Method Thunks" because I accidentially misread the name once. Unmanaged Method Thunks is a concept added in version 2 of Mono, and they allow you to call C# methods with far less overhead compared to mono_runtime_invoke, this means that if you're calling a C# method many times a second, so maybe you have an OnUpdate method in C# that you're calling 60 - 144 times per second, you'd want to create an Unmanaged to Managed Thunk.
Effectivley Unmanaged to Managed Thunks create a custom invokation method (e.g a custom "trampoline") from unmanaged to managed code, and that invokation method is specific to the method signature you gave it, meaning there is no ambiguity as to what parameters can be passed in.
So, when should you use mono_runtime_invoke and when should you use Unmanaged Method Thunks? Well it depends. If you don't know the signature of the method at compile time (C++ compile time) then you have should probably use mono_runtime_invoke, although you can use Unmanaged Method Thunks as well, but generally for those you want the parameters to be known at compile time.
A general rule of thumb is that if you're calling a C# method several times (more than 10 I'd say) per second, and you know the signature of that method at compile time you should use Unmanaged Method Thunks.
If you don't know the method signature at compile time or if you're only calling the method every now and then instead of several times per second you probably want to go with mono_runtime_invoke.
Retrieving and Invoking a C# Method
Alright, now that we understand the difference between mono_runtime_invoke and Unmanaged Method Thunks it's finally time to get a reference to the C# method we want to call.
There are a lot of different ways to get a reference to a C# method, and the method you'll use entirely depends on if you're parsing the C# assembly and you don't know what methods are going to be in there beforehand, and one for if you already know the method name and signature, as well as what class it belongs to, before you even load the assembly.
In this case we'll be using the manual way of getting references to methods, but we will cover the more dynamic way later on. Alright, with that out of the way it's time to take a look at the code.
The Code
MonoObject* InstantiateClass(const char* namespaceName, const char* className)
{
    // Get a reference to the class we want to instantiate
    MonoClass* testingClass = GetClassInAssembly(s_AppAssembly, "", "CSharpTesting");

    // Allocate an instance of our class
    MonoObject* classInstance = mono_object_new(s_AppDomain, testingClass);

    if (classInstance == nullptr)
    {
        // Log error here and abort
    }

    // Call the parameterless (default) constructor
    mono_runtime_object_init(classInstance);
}

void CallPrintFloatVarMethod(MonoObject* objectInstance)
{
    // Get the MonoClass pointer from the instance
    MonoClass* instanceClass = mono_object_get_class(objectInstance);

    // Get a reference to the method in the class
    MonoMethod* method = mono_class_get_method_from_name(instanceClass, "PrintFloatVar", 0);

    if (method == nullptr)
    {
        // No method called "PrintFloatVar" with 0 parameters in the class, log error or something
        return;
    }

    // Call the C# method on the objectInstance instance, and get any potential exceptions
    MonoObject* exception = nullptr;
    mono_runtime_invoke(method, objectInstance, nullptr, &exception);

    // TODO: Handle the exception
}

// ...
MonoObject* testInstance = InstantiateClass("", "CSharpTesting");
CallPrintFloatVarMethod(testInstance);
Explaining the Code
Alright, as you can see I've taken the code from the previous section and wrapped it in a function for convenience. But what we're interested in is the CallPrintFloatVarMethod function, which will call (or invoke) the PrintFloatVar on the instance of the CSharpTesting class. Remember that methods are stored inside classes, but you invoke them on an instance of that class. Essentially all C# methods have an implicit parameter that references the instance of the class that the method is being called on, which is effectively what let's us use the this keyword. Luckily we don't have to pass that as an explicit parameter in Mono, but it's good to properly understand how it works behind the scenes.
The first thing we do before calling the method is getting a MonoClass pointer from the class instance, we could also pass the class to the C++ function if we wanted to. We can get the class by calling mono_object_get_class and passing in the MonoObject pointer as the only parameter.
Next we actually need to get a reference to the C# method, or MonoMethod, and as with everything in Mono we get it as a pointer. The function we use to get the pointer is mono_class_get_method_from_name. Yes I know, Mono can be very verbose... The first parameter we need to pass is the class that the method belongs to, it's worth nothing that if the method doesn't actually exist in the class the function will return nullptr. The second parameter is the name of the method we want to get.
Lastly we need to tell Mono how many parameters the method has. If it doesn't have any we simply pass 0, or we could optionally pass -1 in which case Mono will simply return the first version of the method that it finds.
It's important to note that if there's multiple versions of the method that has the same number of parameters this function won't work properly, since it doesn't check the actual signature of the method, just that it has the correct number of parameters. There are ways to get methods by a specific signature though, we'll cover that later as well.
Alright, now that we've got a reference to the C# method we can actually invoke it, which as I explained in the first part of this article we can do by calling mono_runtime_invoke.
But before we call that you can see that I've declared a pointer to a MonoObject and called it exception, as well as assigned it to nullptr. Why? Well it's because if the method we call throws an exception our scripting engine would probably want to know about that so we can e.g log that exception to a console window or something along those lines.
If the method throws an exception mono_runtime_invoke will populate that MonoObject with the exception instance, which we can then use to get information about what went wrong.
So now that I've explained that, what are all the parameters of mono_runtime_invoke? The first parameter is simply the pointer to the C# method that we want to invoke. The second parameter is the class instance that we want to call the method on. The third parameter is a pointer to an array of any parameters we want to pass in, but since PrintFloatVar doesn't take any parameters we can simply pass nullptr.
And the last parameter is a pointer to the MonoObject* we declared on the previous line, it's the memory address of our exception variable. If you don't care about exceptions at this time you can just pass nullptr and Mono will ignore that parameter.
It's also worth noting that mono_runtime_invoke can actually return something to us. A MonoObject* in fact. This is useful if the method you're calling returns something and you want to retrieve and do something with that return value in C++. If the method is marked as void then mono_runtime_invoke will simply return nullptr.
Our method doesn't return anything so we won't bother dealing with that for now, but don't worry I'll be sure to cover this as well.
Passing Parameters to a Method
Now that we can call C# methods that don't return anything or take any parameters, I think it's time to learn how we can pass parameters to C# methods from C++. Before we get started I will say that passing parameters often times involves "Marshalling" the data between unmanaged and managed memory. I won't go into too much detail about what marshalling is, or how Mono handles it, but this article explains it in a pretty good way, so I highly recommend reading it if you're interested in learning more. I also recommend reading this example of marshalling in Mono specifically.
It's important to note that Mono will almost never handle marshalling for us, meaning we will need to do some manual type checking and coversions later on, for now we'll just be passing a simple float, which doesn't need to be marshalled in the first place.
The Code
void CallIncrementFloatVarMethod(MonoObject* objectInstance, float value)
{
// Get the MonoClass pointer from the instance
MonoClass* instanceClass = mono_object_get_class(objectInstance);
// Get a reference to the method in the class
MonoMethod* method = mono_class_get_method_from_name(instanceClass, "IncrementFloatVar", 1);
if (method == nullptr)
{
// No method called "IncrementFloatVar" with 1 parameter in the class, log error or something
return;
}
// Call the C# method on the objectInstance instance, and get any potential exceptions
MonoObject* exception = nullptr;
void* param = &value;
mono_runtime_invoke(method, objectInstance, ¶m, &exception);
// OR
MonoObject* exception = nullptr;
void* params[] =
{
&value
};
mono_runtime_invoke(method, objectInstance, params, &exception);
// TODO: Handle the exception
}
// ...
MonoObject* testInstance = InstantiateClass("", "CSharpTesting");
CallIncrementFloatVarMethod(testInstance, 5.0f);
Explaining the Code
Alright, as you can see the code is very similar to when we didn't pass any parameters, so I won't explain all the code again. You can see that in the first example we declare a variable of type void* called param, and simply assign it to the memory address of value. The reason we do this, and the reason why it's fine to assign it to hold the memory address of a temporary value, is because mono_runtime_invoke has to be capable of accepting any parameter type, and Mono is a C library meaning templates are out of the question.
In our simple case Mono will most likely just copy the data stored at that memory address directly into managed memory, since it's a simple float. Keep in mind that some types may require us to manually marshal the data, either by constructing an instance of a C# class, or by converting a C-style string to a MonoString* and passing that.
I'll be sure to cover how we can handle these cases later on.
In the second example we don't just declare a void*, but rather an array of void*. We would do this if we need to pass multiple parameters to the method, and we'd have to make sure that the array stores the parameters in the same order that they're declared in the method signature.
If you're wondering how Mono knows what the size of the data array that we pass is, it's simply because it expects the total size of that array to equal the size of all the parameters in the C# method, meaning if the array size doesn't match the parameter count you will end up with problems, and Mono may not tell you about it.
And that's the basics of how we can retrieve and invoke C# methods from C++! I will obviously go into more depth about parameter types and how we can convert between C++ types and C# types later on.
Fields and Properties
In this section we'll cover how we can get a reference to, and interact with both C# fields and properties. The only reason why I'll cover properties alongside fields is because Mono let's us interact with properties as if they were regular fields (almost), even though properties are essentially just syntactical sugar around a field and 2 methods.
If you want to read up more on properties in C# check this article from the Microsoft Docs.
Now as with most things in Mono there's several ways of getting a reference to a C# field or property, and which one you'll use depends on if you want to iterate through all fields and properties, or if you want to get any specific field or property. It's also important to note that as with methods we don't get a field or property from an instance of class, but rather from the class itself, and then we simply access the field or property using the class instance.
Alright now that we understand that it's time to take a look at the code, you'll probably notice that I've changed the C# class code a bit.
Getting References to Fields and Properties
using System;

public class CSharpTesting
{
    public float MyPublicFloatVar = 5.0f;

    private string m_Name = "Hello";
    public string Name
    {
        get => m_Name;
        set
        {
            m_Name = value;
            MyPublicFloatVar += 5.0f;
        }
    }

    public void PrintFloatVar()
    {
        Console.WriteLine("MyPublicFloatVar = {0:F}", MyPublicFloatVar);
    }

    private void IncrementFloatVar(float value)
    {
        MyPublicFloatVar += value;
    }

}
And on the C++ side of things:
MonoObject* testingInstance = InstantiateClass("", "CSharpTesting");
MonoClass* testingClass = mono_object_get_class(testingInstance);

// Get a reference to the public field called "MyPublicFloatVar"
MonoClassField* floatField = mono_class_get_field_from_name(testingClass, "MyPublicFloatVar");

// Get a reference to the private field called "m_Name"
MonoClassField* nameField = mono_class_get_field_from_name(testingClass, "m_Name");

// Get a reference to the public property called "Name"
MonoProperty* nameProperty = mono_class_get_property_from_name(testingClass, "Name");

// Do something
Explanation
Now we have some very basic code that allows us to get a reference to all the fields an properties we want.
Before I show you how we can interact with them I want to take a moment to explain something: Mono does not care about the accessibility of classes, methods, fields or properties that we want to access.
Do you want to set the value of a private field? Mono let's you. Want to set a private property to null in the middle of an update loop and crash the entire application? You can do that. Mono does not care.
Which of course means that it's our responsibility to respect the accessibility of all of those. Now, I'm not saying that you should completely ignore non-public fields or properties, it can be very useful to be able to access those for debuggability reasons.
But what I am saying is that your scripting engine should never be able to set the value of a non-public field or property unless the writer of that code explicitly allows it.
You can for an example add a C# attribute that the user can add to their private fields that tells the scripting engine that it can set the value of that field, in Hazel we have an attribute called ShowInEditor which allows the engine to set the value of that field. Unity has SerializeField which does the same.
Alright, now let's see how we can get e.g the accessibility of the fields and properties that we just retrieved.
Checking Accesibility
enum class Accessibility : uint8_t
{
    None = 0,
    Private = (1 << 0),
    Internal = (1 << 1),
    Protected = (1 << 2),
    Public = (1 << 3)
};

// Gets the accessibility level of the given field
uint8_t GetFieldAccessibility(MonoClassField* field)
{
    uint8_t accessibility = (uint8_t)Accessibility::None;
    uint32_t accessFlag = mono_field_get_flags(field) & MONO_FIELD_ATTR_FIELD_ACCESS_MASK;

    switch (accessFlag)
    {
        case MONO_FIELD_ATTR_PRIVATE:
        {
            accessibility = (uint8_t)Accessibility::Private;
            break;
        }
        case MONO_FIELD_ATTR_FAM_AND_ASSEM:
        {
            accessibility |= (uint8_t)Accessibility::Protected;
            accessibility |= (uint8_t)Accessibility::Internal;
            break;
        }
        case MONO_FIELD_ATTR_ASSEMBLY:
        {
            accessibility = (uint8_t)Accessibility::Internal;
            break;
        }
        case MONO_FIELD_ATTR_FAMILY:
        {
            accessibility = (uint8_t)Accessibility::Protected;
            break;
        }
        case MONO_FIELD_ATTR_FAM_OR_ASSEM:
        {
            accessibility |= (uint8_t)Accessibility::Private;
            accessibility |= (uint8_t)Accessibility::Protected;
            break;
        }
        case MONO_FIELD_ATTR_PUBLIC:
        {
            accessibility = (uint8_t)Accessibility::Public;
            break;
        }
    }

    return accessibility;
}

// Gets the accessibility level of the given property
uint8_t GetPropertyAccessbility(MonoProperty* property)
{
    uint8_t accessibility = (uint8_t)Accessibility::None;

    // Get a reference to the property's getter method
    MonoMethod* propertyGetter = mono_property_get_get_method(property);
    if (propertyGetter != nullptr)
    {
        // Extract the access flags from the getters flags
        uint32_t accessFlag = mono_method_get_flags(propertyGetter, nullptr) & MONO_METHOD_ATTR_ACCESS_MASK;

        switch (accessFlag)
        {
            case MONO_FIELD_ATTR_PRIVATE:
            {
                accessibility = (uint8_t)Accessbility::Private;
                break;
            }
            case MONO_FIELD_ATTR_FAM_AND_ASSEM:
            {
                accessibility |= (uint8_t)Accessbility::Protected;
                accessibility |= (uint8_t)Accessbility::Internal;
                break;
            }
            case MONO_FIELD_ATTR_ASSEMBLY:
            {
                accessibility = (uint8_t)Accessbility::Internal;
                break;
            }
            case MONO_FIELD_ATTR_FAMILY:
            {
                accessibility = (uint8_t)Accessbility::Protected;
                break;
            }
            case MONO_FIELD_ATTR_FAM_OR_ASSEM:
            {
                accessibility |= (uint8_t)Accessibility::Private;
                accessibility |= (uint8_t)Accessibility::Protected;
                break;
            }
            case MONO_FIELD_ATTR_PUBLIC:
            {
                accessibility = (uint8_t)Accessbility::Public;
                break;
            }
        }
    }

    // Get a reference to the property's setter method
    MonoMethod* propertySetter = mono_property_get_set_method(property);
    if (propertySetter != nullptr)
    {
        // Extract the access flags from the setters flags
        uint32_t accessFlag = mono_method_get_flags(propertySetter, nullptr) & MONO_METHOD_ATTR_ACCESS_MASK;
        if (accessFlag != MONO_FIELD_ATTR_PUBLIC)
            accessibility = (uint8_t)Accessibility::Private;
    }
    else
    {
        accessibility = (uint8_t)Accessibility::Private;
    }

    return accessibility;
}

// ...

MonoObject* testingInstance = InstantiateClass("", "CSharpTesting");
MonoClass* testingClass = mono_object_get_class(testingInstance);

// Get a reference to the public field called "MyPublicFloatVar"
MonoClassField* floatField = mono_class_get_field_from_name(testingClass, "MyPublicFloatVar");
uint8_t floatFieldAccessibility = GetFieldAccessibility(floatField);

if (floatFieldAccessibility & (uint8_t)Accessibility::Public)
{
    // We can safely write a value to this
}

// Get a reference to the private field called "m_Name"
MonoClassField* nameField = mono_class_get_field_from_name(testingClass, "m_Name");
uint8_t nameFieldAccessibility = GetFieldAccessibility(nameField);

if (nameFieldAccessibility & (uint8_t)Accessibility::Private)
{
    // We shouldn't write to this field
}

// Get a reference to the public property called "Name"
MonoProperty* nameProperty = mono_class_get_property_from_name(testingClass, "Name");
uint8_t namePropertyAccessibility = GetPropertyAccessibility(nameProperty);

if (namePropertyAccessibility & (uint8_t)Accessibility::Public)
{
    // We can safely write a value to the field using this property
}

// Do something
Explanation
Now, I know that was a lot of code, but I highly recommend that you make sure you don't write to non-public variables unless the person who wrote the code allows it, since they probably don't expect the scripting engine to do so normally.
You may notice that we store the accessibility in a bit field, the reason for this is because C# allows you to mark class fields and properties as protected internal or private protected. In which case it's more efficient for us to store e.g both Accessibility::Protected and Accessibility::Internal in the same variable. Now it's entirely possible that you only care if the field / property is public or not, in which case you could just return a bool and call the function e.g IsFieldPublic / IsPropertyPublic.
GetFieldAccessibility
So how does GetFieldAccessibility work? Well it's very simple, we start by retrieving all the flags set on the passed field (which stores more than just accessibility data), and then we extract the accessibility data from that by using the bitwise AND operator on the flags and the MONO_FIELD_ATTR_FIELD_ACCESS_MASK mask.
This will give us a value that represents one of these possible access types:
- MONO_FIELD_ATTR_PRIVATE
- MONO_FIELD_ATTR_FAM_AND_ASSEM
- MONO_FIELD_ATTR_ASSEMBLY
- MONO_FIELD_ATTR_FAMILY
- MONO_FIELD_ATTR_FAM_OR_ASSEM
- MONO_FIELD_ATTR_PUBLIC
You can look at the code if you're curios as to what each of these represents. So, we do a switch on the access flag, and check for each of these values, then simply assign the correct Accessibility value to the accessibility variable depending on which case statement we hit.
GetPropertyAccessibility
As you can probably tell from the code getting the accessibility of a property isn't quite as easy as getting it from a field. The reason for this is because a property essentially represents two methods. A getter and a setter. Meaning we can't directly query the accessibility of the property, but rather we have to query the accessibility of the methods. This is made even more complicated by the fact that that properties are not required to have both a getter and a setter, only one is required. And if you create an auto-property, e.g public string MyProp => m_MyValue; C# will only generate a getter, not a setter.
So, here's how that works. We start by getting a reference to the getter method, which we can do easily by calling mono_property_get_get_method and passing in the property. We then get the accessibility flags from that getter (if it exists) by calling mono_method_get_flags and passing in the getter method, as well as nullptr. That last parameter simply represents the method implementation flags. If you're curios about what these are you can check this article. We're passing nullptr because we're not interested in those flags right now.
And just like we did in GetFieldAccessibility we perform a bitwise AND operation to get the accessibility flag, perform a switch on that and store the result in the accessibility variable.
After we've done that we do something similiar with the setter, assuming it exists, the difference is that for the setter we only check if it's not public, in which case we set the accessiblity variable to Accessibility::Private, since we can't write to the property if the setter is private. We also set the accessiblity to private if there is no setter.
Another difference between the getter and setter is that for the setter we obviously have to call mono_property_get_set_method instead of mono_property_get_get_method.
Setting and Getting Values
Alright after that very lengthy talk about accessibility it's finally time to set and get some values! Now this is can be a very complex topic, especially when you start dealing with actually marshalling data, we won't be dealing with that too much right now though.
We'll start by getting and setting the value of MyPublicFloatVar, and then we'll move on to doing the same for the Name property.
bool CheckMonoError(MonoError& error)
{
	bool hasError = !mono_error_ok(&error);
	if (hasError)
	{
		unsigned short errorCode = mono_error_get_error_code(&error);
		const char* errorMessage = mono_error_get_message(&error);
        printf("Mono Error!\n");
        printf("\tError Code: %hu\n", errorCode);
        printf("\tError Message: %s\n", errorMessage);
		mono_error_cleanup(&error);
	}
	return hasError;
}

std::string MonoStringToUTF8(MonoString* monoString)
{
	if (monoString == nullptr || mono_string_length(monoString) == 0)
		return "";

	MonoError error;
	char* utf8 = mono_string_to_utf8_checked(monoString, &error);
	if (CheckMonoError(error))
		return "";
	std::string result(utf8);
	mono_free(utf8);
	return result;
}

MonoObject* testingInstance = InstantiateClass("", "CSharpTesting");
MonoClass* testingClass = mono_object_get_class(testingInstance);

MonoClassField* floatField = mono_class_get_field_from_name(testingClass, "MyPublicFloatVar");

// Get the value of MyPublicFloatVar from the testingInstance object
float value;
mono_field_get_value(testingInstance, floatField, &value);

// Increment value by 10 and assign it back to the variable
value += 10.0f;
mono_field_set_value(testingInstance, floatField, &value);

MonoProperty* nameProperty = mono_class_get_property_from_name(testingClass, "Name");

// Get the value of Name by invoking the getter method
MonoString* nameValue = (MonoString*)mono_property_get_value(nameProperty, testingInstance, nullptr, nullptr);
std::string nameStr = MonoStringToUTF8(nameValue);

// Modify and assign the value back to the property by invoking the setter method
nameStr += ", World!";
nameValue = mono_string_new(s_AppDomain, nameStr.c_str());
mono_property_set_value(nameProperty, testingInstance, (void**)&nameValue, nullptr);
Explanation
Fields
So, there's a lot to unpack here. We'll start with the mono_field_get_value function. It takes three parameters, the first one being the class instance that we want to get the value from, the second one being the field we want to get the value from, and the third being a pointer to a variable that will hold the value C++ side.
One of the most important things you have to understand here is the difference between getting a value type like a float, or an int or even a struct, and getting a reference type like a class. If you're getting a value type as long as the value isn't boxed, like we're doing, you can simply declare a variable of the C++ equivalent type and pass the memory address of that variable. The size of the C++ type has to match the size of the C# type though, and if you're using a struct the layout has to match as well.
If you're getting a reference type though you have to declare a MonoObject pointer, since reference types are always allocated on the heap.
Alright, with that out of the way we can increment the value and reassign it to the field by calling mono_field_set_value, passing in the class instance, the field and the memory address of the variable, assuming it's a value type.
If you wanted to confirm that the C# field got updated correctly you could simply retrieve the value again and check that. Naturally you'd probably want to have a flexible system set up that will handle these conversions in a better way, and that adds a degree of type-safety since Mono will simply accept the value as long as the size of it matches the C# field, and it will most likely not tell you that anything's wrong.
Properties
Alright, now it's time to get to how we get and set values when dealing with properties, unfortunately it's quite a bit different from dealing with fields. I will not be explaining the CheckMonoError or the MonoStringToUTF8 in detail, I'll leave that for later. But in short the MonoStringToUTF8 simply takes a MonoString pointer, which simply holds a pointer to the C# managed string, and it then copies that into unmanaged memory and returns an std::string.
And CheckMonoError simply extracts an error code and message from the given MonoError struct and then logs that to the console.
First of all we call mono_property_get_value, which will invoke the properties getter method for us. The first two parameters are simply the property itself and the class instance. The last two parameters, where we pass nullptr represent any parameters that the getter method might expect, and lastly a pointer to a MonoException* that we can get back from the method in case it throws one. The third parameter doesn't really make sense in my opinion since a property's getter method can't take any parameters that I'm aware of, so I'll always pass nullptr.
As you can see we're getting a string, and because of that we simply get a pointer to a MonoString struct, which holds a pointer to the C# string, in managed memory. It's important to note that mono_property_get_value returns a MonoObject pointer, which in the case of a string should simply be cast to a MonoString pointer.
In the case of e.g a value type it will return the value boxed inside a MonoObject, meaning we'll have to unbox it. I highly recommend you read up on boxing and unboxing here.
But since in this case we're getting a string we simply cast it, and then convert it to an std::string. As you can see we do use mono_string_to_utf8_checked, and I wanted to mention that if there is a "checked" version of a Mono function available you should always use that one, and never the unchecked version. This function also returns a pointer to a buffer, and we're in charge of freeing it after we're done with it. So keep that in mind.
If you want to see how to deal with unboxing value types like floats, see the code I've written below.
Alright, now that we've got our string and we've modified it, it's time to assing it back to C#. As I'm sure you're aware we're doing a lot of copying here, but don't worry too much about it since you most likely won't be getting and setting C# values from C++ every frame.
In order to invoke the setter function of the property we call mono_property_set_value, and just like with the getter we pass the property and the class instance. Then we have to pass the value itself. The last parameter is again a pointer to a MonoObject*, which will contain any exceptions thrown by the setter. I'm passing nullptr here again.
The important thing to understand about mono_property_set_value is that you cannot pass the memory address of value types directly like you can with mono_field_set. This function will crash if you do.
What you need to do instead is create an array of void* and store the address in that array. I'm not sure why this is the case but it is. So you'd something along the lines of void* data[] = { &myValueTypeData }; and then pass that array like this: mono_property_set_value(prop, instance, data, nullptr);.
In the case of a MonoObject* or a MonoString* you can simply pass the memory address and cast it to a void**. Although I do recommend going with the void* array approach, since that works at all times.
You can probably tell that in the example above we call mono_string_new, and pass the AppDomain as well as the C string in order to construct a new MonoString. We do this because we can't, and shouldn't attempt to modify the MonoString we got from the property, I won't go into too much detail on strings because I'll cover them in-depth later on.
Dealing with Value Types and Properties
MonoProperty* floatProperty = mono_class_get_property_from_name(testingClass, "MyFloatProperty");

// Get the value of Name by invoking the getter method
MonoObject* floatValueObj = mono_property_get_value(floatProperty, testingInstance, nullptr, nullptr);
float floatValue = *(float*)mono_object_unbox(floatValueObj);

// Modify and assign the value back to the property by invoking the setter method
floatValue += 10.0f;
void* data[] = { &floatValue };
mono_property_set_value(nameProperty, testingInstance, data, nullptr);
Alright! Now we're done with the basics of fields and properties. Yes, I know it's ironic that I call this the basics considering the length of this article but it's important that you really understand how it works.
There is so much more that I'd like to cover when it comes to dealing with fields and properties, but I have to restrain myself or this article will be 50,000 paragraphs. In the next section we'll cover Internal Calls, which will allow C# code to call C++ functions.